December 03, 2010

Onde Onde

This is really a favorite of most people when they try it. Because it is really a taste you will never forget it has a nice chewy texture(similiar to a Chinese/ Japanese mochi cake) and that when you bite in it a warm molten syrup filling just burst into your mouth. The coating of fresh grated coconut will be best but if not use good quality dessicated coconut will do the trick too.

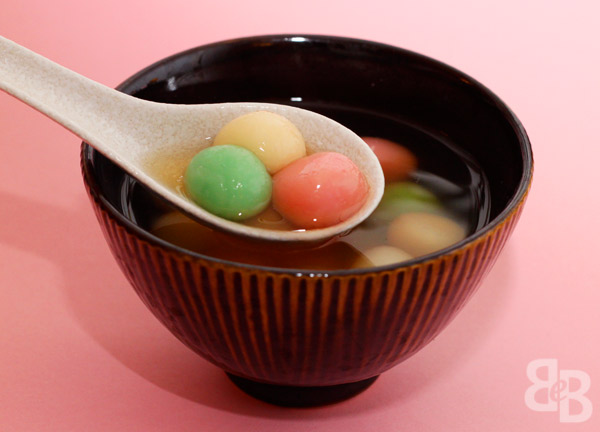
This is definitely one of the most popular Asian dessert/ snack that you find around the world. In Indonesia these same sweet balls are called klepon.There are many different variety out there but the one i am sharing is the original one or in my eyes they are.

Onde Onde


Dough
½ cup glutinous rice flour
100ml coconut milk
pandan aroma pasta ( from your Asian store)


Fillings
½ cup shaved dark (Indonesian) palm sugar
(Rolled it to tiny balls so its easy to stuffed them later.)


Coating for rolling finished balls 
½ cup desiccated coconut + ¼ tsp crushed sea salt mixed into it.


  • Knead glutinous rice flour with coconut milk till a ball gathers and the dough is slightly moist.Then add in the pandan pasta and knead till incorporated. If the dough seems a little dry add a little water or coconut milk. Plastic wrap immediately to keep moist.
  • To stuff the dough, pinch a small portion of the dough, toll roughly into a ball and squash so it's about four to five mm thick. Place the palm sugar into the centre and covered, then pinch away any dough you think it is too much as you do not want it too be too doughy. Roll in palm of hands till you form a perfect ball.
  • As the balls are rolled, position them on a baking tray lined with parchment.
  • Fill a medium to large pot with boiling water and the coconut coating ready in separate bowls. Drop the balls in five to six at a time so you can manage the coating immediately after cooking. When the balls are cooked, they will float to the top. Scoop them out with a slotted spoon.
  • Tip balls into coating and roll till completely covered. Arrange attractively on a plate and serve. Store in airtight container. These are best eaten right away or the same day.

Winter feel good.

Is that time of the year again where everyone is just busy with the coming celebrations of Christmas and New Years. And over here we have Sinterklaas to top that busy December month off.(Sinterklaas is a traditional Winter holiday figure in the Netherlands,Belgium, Aruba, Suriname and the Netherlands Antilles he is celebrated annually on Saint Nicholas' eve 5 th December. The feast celebrates the name day of Saint Nicholas, patron saint of Amsterdam, children and sailors. He is the basis of the mythical holiday figure of Santa Claus in the United States.)


 I, myself have been busy with the kids and getting involve with school so much that i hardly have time to update my blog as the end of the day i am all knackered. But told myself i want to built my site up so i have to make time. Here i have shared an easy Chocolate Brownies recipe that even your kids can do it. Quick, easy, moist and most definitely no laking in taste!


Chocolate Brownies


125g Butter
125g Dark Chocolate
2 Eggs
3/4 cup Superfine caster sugar
1 cup Plain flour
2 tbsp Self - raising flour
3/4 cup chopped Pecan or macadamia nuts
1/2 cup mini marshmallow

  • Place butter and chocolate in a saucepan over very low heat. And stir until mixture is just smooth.
  • Place eggs and caster sugar in a bowl and beat until mixture is pale and thick. Fold in the chocolate mixture, sifted the flours, marshmallow and nuts through butter and eggs and pout mixture into a greased brownie tray or 20cm square cake tin.
  • Bake in a preheated 180c oven for 30 minutes or until the brownies are set.
  • Allow it to cool and cut them into squares.
  • Served  with either whipped cream or some vanilla ice-cream. And a strong cup freshly brewed coffee.


October 31, 2010

Halloween Specials


Halloween is just around the corner and i am really in the mood for it. Even though in Holland its not that big like in USA but there are still little ghosts, ghouls, goblins knocking on your door. And especially now that Lucas is older (5) i thought why not get more involved in the spirit of Halloween. So we have done our Jack O lantern deco and next will be the little treats. And i thought why not make some red velvet cake as i have always wanted to try making them. Now will be a great moment with the red color just look so cool for this theme.

I hope you enjoy Halloween as much as we did Happy Halloween.

Red Velvet Cake


For the cake
115g butter, softened
1 1/2 cups sugar
2 eggs
2 tbsp red food coloring
2 tbsp cocoa powder (heaping)
1 cup buttermilk
2 1/4 cups cake flour
1 tsp vanilla essence
1 tsp baking soda


For the Frosting
2 packages cream cheese, softened
1/2 cup butter, softened
1 tsp vanilla essence
2 cups icing sugar, confectioners'sugar                                                                                                                         
For the cake
  • In a large mixing bowl, cream together butter and sugar. Add eggs one at a time, beating well after each addition.
  • In another bowl, mix red food coloring and cocoa until cocoa is completely dissolved. Add to the creamed mixture.
  • Mixing on low speed, add buttermilk and flour alternately, beginning and ending with flour. Mix well but do not over-beat to ensure a light fluffy cake. Add vanilla essence, mix well.
  • Blend the baking soda into the batter. Transfer into a floured and greased 9 inch round cake pan. Bake in preheated 180C oven for 30-40 minutes. Cool.
For the frosting
  • In a medium bowl, cream together the cream cheese and butter until creamy. 
  • Mix the vanilla and then gradually stir in the icing sugar. Store in the refrigerator after use.
Once cake is cooled halve it and then spread some frosting in between and sandwich the cake. Frosted the rest of the cake or to your liking. I have made some chocolate spiders to give it a spooky feel. But like i say the cake is up to you to decorate to your liking.


Also what you can do with this recipe like i did i used the cake to make little truffle cakes.
Just baked the cake crumble it after baking, mixed it through the frosting, and then roll it to the shape you want and chilled it in the fridge for or a few hours or pop it in the freezer. When the shapes are firmed up you can than coat it with chocolate or anything you want. Decorate and design it to you liking and allowed it to dry and its done.
Here are some of mine for the Halloween theme.


October 29, 2010

Chocolate Rice Krispie Treats

Fall break is here, weather is cold and wet so the kids have to be indoors. What better than to get them involved with cooking. Here is a easy recipe for kids and adults. Believe me these little treats goes fast!

Chocolate Rice Krispie Treats

80g of butter
1 pack of regular Marshmallows
6 cups Chocolate Rice Krispie or (Coco Pops)
1 cup to 1 1/2 cups Good quality Cocoa powder
  

  • In a large saucepan melt butter over low heat. Add the marshmallow and stir until completely melted.
  • Remove from heat and add the chocolate rice krispie and cocoa powder. Mix well might be a bit hard as it gets very gooey.
  • Have a square tray of your choice either deep or shallow dish cover it with baking paper. Spread the mixture on to the tray pressing it down with a oiled spatula and smooth the top.
  • Make sure it is nicely packed. Cool it down and then its ready to cut to any shape you want.
  • You can also use them on Cupcake trays.....eat it on its own or add candies,sprinkles the choices are endless.


October 26, 2010

Steamed Taro Cake ( Wu Tow Ko)


This is a Malaysian version of Steamed Taro/ Yam Cake. Just had a craving for this local delight that i have not had for ages and since i manage to got my hands on some Taro why not give it a go. Mum used to make them too and everyone really enjoy the homemade ones as they are nicer and of cause we always add more of the ingredients (Liau) that makes it tasty.


Steamed Taro Cake


1 1/2 cups rice flour
1/2 cup cornflour
1 litre cool water
vegetable oil, for frying 
1 1/2 cups dried shrimps soaked in hot water 
squeezed and finely chopped
3 Chinese sausage/ lap cheong,finely chopped (for meat version)
1 cup dried chinese mushroom,soaked in hot water
squeezed and finely chopped ( 2 cups maybe use if not doing meat version)
400g yam diced in to 1cm cubes
1 1/2 tsp Chinese 5 spice powder
1 tsp sea salt
1 tsp sugar
1/3 cup chopped spring onions
red chilli finely chopped 
Fried shallots ( bought from store)
Garlic chilli sauce


For those who do not know, this is what Taro/ Yam looks like.
  • Mix rice flour and cornflour with water to make a thin batter
  • Saute shrimp,sausage and mushroom in oil till slightly colored and fragrant. Add Taro, five spice powder, salt, sugar and yam batter. Cook on medium heat, stirring and scraping the sides of the pan continuously till the mixture is thick starchy paste. Taste and season further if needed.

  •  Heat water in the steamer. Transfer the Taro paste to a round spring form cake tin ( 22- 23cm)
  • Turn heat up so the water is boiling and steam cake for 40 - 45 minutes.
  • To check if the cake is ready test it with a pricker on the taro once taro is soft is ready.
  • Do not worry if cake looks a little wobbly when first out of steamer, as it will firm up as it cools down.
  • Sprinkle the spring onions, fried shallots and freshly chopped red chillies over the top.
  • Serve with garlic chilli sauce.


Leftovers can be kept in the fridge and warm up the next day or slice them up and pan fry them till golden and served! Both ways yummy. 

It can also be frozen up so whenever you crave for it, you know where to find them.


October 24, 2010

Arancini Balls

Arancini ( Little Oranges) are Sicilain specialty, Arancini are fried rice balls coated with breadcrumbs . The arancini can be stuffed with meat sauce and cheese, just cheese, cheese and ham and even with chocolate (using a sweet version of the risotto). The possibilities are endless !

Arancini Balls

For rice mixture
20g butter
1 tbsp olive oil
1 onion, chopped
6 cups chicken or vegetable stock
2 cups arborio rice or risotto rice of your choice
1/2 cup finely grated parmesan cheese 
sea salt to taste and cracked pepper
( You can also add anything you like for extra flavor in the risotto like finely chopped spinach,carrot or even finely grated lemon rind for a nice citrus risotto)
  • Heat A large saucepan over medium heat. Add the butter, oil and onion and cook for 6-8 mins or until soft.
  • Place the stock in a separate saucepan, cover and bring to a slow simmer.
  • Add rice and if using any other optional ingredients to the onion mixture, stirring over medium heat for 2 mins or until the rice is translucent.
  • Add the hot stock 1 cup at a time, stirring continuously, until each cup of stock is absorbed and the rice is al dente ( around 25-30 mins) then stir through the parmesan, salt and pepper. 
Allowed the risotto to cooled

For stuffing
70g mozzarella cut into bite size pieces and fresh basil leaves

For the coating
2 beaten eggs, seasoned with salt and pepper
about 300g dried breadcrumbs

For frying
Vegetable oil

  • Wet your hands with cold water then start by picking up a handful of the rice mixture. Put it in your left hand. Now cup your hand and push the rice in and around your hand to make a mould for the filling.
  • Place a piece of mozarella cheese and basil leave in the middle, press the risotto cover to enclose it and roll into a ball. Repeat with the remaining mixture. When you've finished rolling the arancini put them back in the fridge for about 30mins to firm up.
  • Take the arancini out of the fridge and coat them with the beaten egg and then the breadcrumbs. Heat the oil over a medium heat. Fry the arancini till golden and crispy (about 5-6 mins) then drain on some kitchen paper. You can eat them as a snack or serve them with a nice simple salad.


October 21, 2010

Decadent Chocolate Roulade

I was just looking through one of my magazine Australian Women's Weekly and came across this recipe and it looks really good and thought why not give it a go as i've got the ingredients at home and the steps seems easy enough. And it was easy, simple, decadent cake!


Decadent Chocolate Roulade

 1 tbsp caster sugar
200g dark eating chocolate,chopped
1/4 cup (60ml) hot water
1 tsp dry instant coffee
4 eggs, separated
1/2 cup (110g) caster sugar,extra
300ml thickened cream
120g raspberries, strawberries or even banana


  • Preheat oven to 180 deg C / 160 deg C fan-forced. Grease a swiss roll pan. Line base with baking paper.
  • Place a piece of baking paper ,cut same size as the Swiss roll pan, on the bench and sprinkle evenly with caster sugar.
  • Combine chocolate,hot water and coffee in a medium heatproof bowl. Stir over a medium saucepan of simmering water until smooth; remove from heat.
  • Beat egg yolks and extra sugar in a small bowl with an electric mixer for about 5 mins or till thick and creamy.fold egg mixture into warm chocolate.
  • Beat egg whites in a small clean bowl with the mixer till soft peak form. Gently fold whites into chocolate mixture, in two batches. Spread mixture to pan.
  • Bake for about 15 mins.
  • Turn cake to sugared paper, peeling off the baking paper away; use serrated knife to cut away the crisp edges from all sides. Cover with tea towel; cool.
  • Beat cream in a small bowl with mixer until firm peaks form. Spread cake evenly with cream; sprinkle evenly the berries you are using or banana. Roll cake, from long side to a log shape. Cover roll refrigerate for at least 30 mins before serving.

October 20, 2010

Tang Yuan (glutinous rice balls)

The weather is sure getting colder and all of a sudden i just have this craving for a childhood memory dessert of mine, eating something i love when i was young and still do now. Is known as Tang Yuan i remember eating it on special occasions only so i always eat as much as i can as after the occasion is over so is  the Tang yuan. But now adays its much easier to get them if you live in Asia.


Tang yuan is a traditional Chinese dessert which is well loved by all generations. They’re basically glutinous rice balls (either filled or unfilled) that are served in a sweet broth. They’re most popular during the winter solstice usually celebrated in December and symbolizes the day in the year where the day is the shortest. After this celebration, the Chinese believe that the days will be filled with more hours of sunlight, and therefore and increase in the amount of positive energy. In addition, eating these during the winter solstice also symbolizes becoming a year older. Besides eating these during the winter solstice, tang yuan are also made on special celebrations (such as Chinese New Year) and used as an offering to the gods. They are also served during weddings, that it is considered good luck for the bride and groom.


There are many variants of tang yuan, and as I mentioned earlier they can be either filled or unfilled. The unfilled tang yuans tend to be smaller in size, and also tend to be more colourful. The fillings for tang yuan vary – popular fillings are black sesame paste, peanut paste and red bean paste.  The tang yuan are then cooked in a pot of boiling water, and served with a sweet broth. Again, there are many types of sweet broth – my favourite is a sweet broth made with ginger and rock sugar. (Other variants: red bean soup, a combination of fermented glutinous rice/rock sugar)
I’ve never made these before as I always thought they were lots work involve. And I was wrong. These are one of the easiest Chinese foods to make, and I’m not kidding.So i decided to get my 5 years old son involved as it's so much fun like playing with playdoh. And also to my surprise he loved it even the broth was spiced with ginger!

Tang yuan (unfilled)

  • 2 cups glutinous rice flour


  • 1 tbsp caster sugar


  • 200ml water


  • food coloring

  • Mix glutinous rice flour with sugar in a large bowl.
  • Add the water, and slowly knead until it forms a soft paste that does not stick to your hands. (The mixture is very gloopy and sticky at first, but the more you knead it, the less sticky it gets)

  • Divide the dough into portions, and add a few drops of food colouring to each portion. Knead the dough until the food colouring is evenly distributed throughout the dough.
  • Shape the dough into 1-2cm balls.

  • Drop the balls into a pot of boiling water. The tang yuan will float to the surface of the water once they are cooked. Once this happens, transfer the tang yuan to a bowl of cold water to prevent it from sticking to one another. (The reason for boiling the tang yuan in a separate pot is so that they won’t “cloud” up your sweet broth.)


 For the sweet broth:

          4-5 cups water (depends on how much broth you want)
        2 pandan (screwpine) leaves, knotted (Optional)
        1/2 cup rock sugar/brown sugar/caster sugar
        2 inches of ginger
  • Boil the water in a pot until it starts to bubble.
  •  Add the pandan leaves and ginger, and boil for 5 minutes. Add the sugar, turn the heat down, and simmer for 15-20minutes.

When you are ready to eat just scoop the balls out from the cold water and place them in the broth and warm it up just before serving. I find it best to eat hot to warm temperature wise.

Cupcake It Is.

Finally after many thoughts i have decided to make Cupcakes for my son Milo's 2nd birthday.


Cake batter split to 4 lots and add food coloring.The color to your liking.


Scooping a spoon full from each color and layering it.


Cupcakes are frosted with Marshmallow Fluff (my first time working with this product)


And the finishing touch.

September 21, 2010

Planning Milo's 2 years old birthday.


Since i want to master in the Art of Pastry what better way to start putting it into practice now. Wow so many ideas so little time. What do i want to do a beautiful cake or cupcake. But then i have always wanted to try making sugar cookies with beautiful icing!!So what will it be then?

Because i will not be doing just the cakes or cookies but also will be catering for the dinner party adults and kids menu, plus the deco, goodie bags and whatever that involves in a party.

I do not want to be just stuck in the the kitchen but also being able to enjoy the party after all its my son's birthday.


September 10, 2010

Having goals,setting them and getting it done.


Lately i have been thinking i used to be so happy doing the things i want and love. But then it came to a stop as i got married then have my 2 wonderful boys. I am not saying that they stop me from dreaming and goals setting but things just stop all of a sudden and you tent to forget who you were before all that happened.

So now i am slowly trying to get my passion back. The things i know i want to focus on is my love for food, art and fashion. The first thing i want to focus on now is my passion for food. I mean i can cook but then you can never stop learning and inventing new flavours. Plus i have also realise that most chef are not good pastry chef so since i have had only training in the savoury side maybe its time to go to the sweets.